*

Showing posts with label diy. Show all posts

Tuesday, August 4, 2015

Bangin' Balloons

There are these ladies who I love, called the Dating Divas. They have this huge (slightly overwhelming) website with oh, I dunno....LITERALLY A BILLION ideas of ways you can be nice to your husband! They have all these creative date nights, cute notes, scavenger hunts, printables, calendars, game nights, etc, for any occasion. Their website is like the Google mecca of dating your husband. 

So when I'm in a bind, I like to pop over there and brainstorm ideas for how to spoil Stephen. This time, I found an idea called "Night of Surprises." Basically, you plan different activities to do at specific times of the day, label a balloon with each time, and then put the activity on a piece of paper in that balloon. When your husband pops the balloon, they'll know what you have planned for right then. 

I started with that idea, but when I was almost done blowing up the balloons, I had a little spark of creativity: why not put something in this balloon?

It was the 8:45 balloon. The balloon that was supposed to come after rock-climbing, and after dinner, and after dessert. Mhmm. That balloon. 

Luckily, if your fancypants underwear is really more skimpy than fancy, you can easily roll it up and stick it in the balloon. And actually you can easily roll up and stick in three, if you want to give your husband options and you don't mind the balloon being a little heavier. 

I was feeling very smug about my creativity at this point as I secured the 8:45 sign on the balloon. 

And then I realized, I could make this surprise even awesomer! I could take the balloon with us to the restaurant. Give it to a waiter. And tell them to bring it out to our table at 8:45. Stephen would be all, Oh another balloon! I've popped 4 of these already. Just a little piece of paper is going to fly out and that's it. 

He would never even suspect! The waiter would never even suspect! And then, amidst a flurry of stretchy balloon plastic and lace, I would capture everyone's hilarious reactions on my little crappy phone camera, and I would have a delightful memory to entertain me for birthdays to come. 

I left Stephen a note on the morning on August 3rd. "Don't pop all the balloons while I'm gone!" I said. 

I'm doing such a great job building the suspense, I thought. 

"They're all for tonight," I added, out loud. "So just wait until I get home, okay?"

"Okay!" said the Birthday Boy. 

Then I got home from school. After thinking about my surprise all day, I was so excited to just put my plan into action. The time had come! I went to gather up all the balloons....and there, on the table, sat a poked balloon with an 8:45 time card. It's contents were littered around it. 

"Yeahhh sorry," Stephen said, looking at me nervously. "I thought it was AM. I was just really excited....so I popped it, and then I saw what was in it and I realized I wasn't supposed to do that!"

I picked up a piece of the balloon and looked at it in dismay.

"But you can fix it, right?" Stephen asked. "Can you just put it in a different balloon?"

"Babe," I said very calmly. "You just ruined your birthday." 

He laughed and gave me a hug and said he was sorry and promised to forget all about it, and asked if I could just put it in a new balloon. 

So I thought, Okay, the surprise isn't toooootally ruined. Maybe he'll forget which balloon it was, and when we're at the restaurant, he'll still be surprised. The waiter will still be funny to watch. This could still work....

I put together a new balloon, again stuffing it with the paper and all my pretty unmentionables. But somehow this balloon had three tiny holes in the top, so air was slowly eeping out. I had already put everything in it, so I just taped it together, ugly, and hoped that the waiter wouldn't be a total dunce and drop the balloon in the deep fryer or anything. 

It would be funny if Stephen popped it and everything flew out onto the table. But how freaking embarrassing would it be if someone popped my balloon on accident in the kitchen, before they were supposed to bring it out at 8:45, and then a group of 8 waiters stood there saying stupid stuff like "Ohhhh, shooooot, duuuuude, we need to get another balloon! What did you do??" I could totally picture this happening, actually. 

But I comforted myself with the thought that if that happened, they would definitely need to give us a free meal, and it would still make for a funny story. 

THEN. (Oh no! It's not over yet!)

We went over to Stephanie and Craig's house to help them out in their basement. "This will mayyyybe take an hour," Stephen said. "And then we can go hike Stewart Falls! And then go to Applebee's." 

*Stewart Falls was not in the plan, but since it was Stephen's birthday, we obviously were going to do whatever he wanted - planned or not. 

Anyway, we ended up staying there until 9pm (after 4 hours had gone by), and not going to Stewart Falls, and not going to Applebee's. Stephen, as it turns out, loves doing handyman stuff when it's not his house and he doesn't need to pay for it or meet any deadlines. He has actually really been enjoying his time in S&C's kitchen. Obviously. Since that's where he chose to spend his birthday. 

We got in the car at about 9 and went to In'N'Out. 

"Can we do the balloons tomorrow?" Stephen asked. "I really am excited about them, is that okay?"

Um, of course it was. Birthday Boys get to make all the rules. 

We invited the fam over for some birthday dessert. And while we sat around saying what we loved about Stephen, his brothers Michael and Logan found the balloons.

And started batting them around. 

And beating each other with them. 

"Hey," Logan observed. "This one's heavier. See look, it falls so much faster." *Drops it* "What's wrong with this balloon?"

And so it went, for 45 minutes. 

"Please don't pop," I thought over and over. "They probably won't," I convinced myself. "It'll be fine." 

"Hey!" Stephen yelled all of a sudden, when he realized what was happening. "There's sex stuff in those balloons!" 

And that's how everyone started laughing and passing the balloon around, and how I died. 

The end. 

Don't ever try to do anything for your husband's birthday. 

Monday, September 22, 2014

A Handyman and his Handygirl

"Let's get some new cabinets," said the husband.

"Okay!" said the wife. So they went out and got new cabinets and lived happily ever after.

Oh, except actually that is the story of a different husband and wife, maybe named something like, I don't know, Donald and Melania Trump, and it is nothing like the story I am about to relate here.

Our story goes more like this:

December 2013, our first time in the house. 

"This is going to be awesome," says Stephen. "We'll get different floors in here, obviously. And get rid of that yellow. We might as well just get all new cabinets."

May 2014, after 5 months and one loooong semester of school.

"I found some cabinets!" says Stephen. "Only problem is, I don't know if they would fit. They're on KSL, I just have to see if the measurements would work."

*Repeat that maybe 10 times. The measurements don't work, or we hate them, or they are already sold. You may recall that we are kind of KSL connoisseurs, but cabinets are a different story.*

July 2014, while both of us are on break from school. 

"I say we just get new cabinets," says Stephen. "It'll be worth it."

August 2014, when I have just gone off-track for the first time and he has a week off of school. 

"Welcome to Ikea," says no one, because it is not so much a store as it is a 100,000 square foot maze of a building with crooked escalators and deceptive arrows, and you sometimes have to walk for a half-hour before you even come across a worker, who still doesn't welcome you there because they have no idea how recently you actually arrived, and they probably don't want to talk to you, anyway.

"Oh, wow! Isn't that nice!" says a cute little old grandma, scooting into a seat in the kitchen computer place where you go online and design your kitchen. She's hooked! I vow not to be her.

30 minutes later.....

I am also hooked. I have designed my kitchen and I have never been more proud! (To be fair, designed is probably too strong of a word. Actually I just recreated it online from the measurements we took of everything, but still.) Every victory at Ikea feels like a big deal to I-me-a.

45 minutes after that....

I am no longer hooked. I printed out the item list and that's fine, but now I want to leave the store and take Stephen to work. And at this point I have been wanting to leave for about 20 minutes and there are 40 exits in plain view and I'm not allowed to exit out of any of them.

Later that week.....

We did end up finding our way out of Ikea, and now we are standing in the kitchen. We move the refrigerator into the far corner of the kitchen. We move the oven and table into the living room. I cry for a week about how sore I am from that.

"Are we going to be okay without an oven for a while?" Stephen asks.

"Sure," I say. "We can just make meals in the crockpot, or go out to eat. It won't be that long."

We buy a crowbar and start ripping up the kitchen floor. There are so many layers! The laminate is on top of plywood, which is on top of some underlayment, which is so old that it is gray and fuzzy, and the underlayment is on top of the original wood floor. And apparently, whoever laid down these ugly laminate floors in my kitchen had just gotten a brand spankin new heavy duty inch-long staples staple gun right before they got to work up in here, and they did not leave one inch of this floor unstapled.

Fun Fact: Exactly zero staples would have been necessary for this project.

But we can't put down the new floor until every staple has been ripped up, so we get to work. Stephen jams the crowbar under the top two layers, breaking the plywood and peeling up the laminate, and I start exploring the most effective way to pick up staples.

The next day....

My back feels like I have been stepped on by an elephant. As it turns out, the most effective way to pick up the staples is jamming screwdriver underneath and prying it carefully up. But sometimes it is rusted and it breaks, or it gets stuck, or one end comes out before the other, and when that happens, you have to either hammer it into the ground or pull it up with pliers. Pulling it up with pliers is a quick and easy way to feel like you've been stepped on an elephant.

A few days later....

Back to Ikea! We briefly considered getting unfinished cabinets from Home Depot and painting them, but that was short-lived. We eat free breakfast (!!! They do this err Monday??) place our order, pay for them, fit almost everything in the car, call Stephen's mom to come with another car for the last piece, and take our cabinets home. They look like this:

I should have taken my own picture, but I didn't. So here's one from http://bayporthandyman.com/wordpress/ikea-master-installer/ which I read like 4 times before we actually bought our cabinets. 
There are so many boxen, and the first one I open is unfortunately a door, which doesn't come with instructions for obvious reasons, so then I panic and spend 2 hours online searching for directions and regretting everything.

The next day....

I open one of the cabinets. This box has instructions in it. They are pictures, but I am thrilled anyway! There is a little bag of al the screws / nails I will need for this cabinet box. I build my first Ikea cabinet and almost fall over, I am so proud of myself. I call my mom and txt my sister and sit there smiling at the cabinet for about five minutes.

One week after that.....

I have put all the cabinets together! And the floor is all the way ripped up! I am back in school, so it's harder to get stuff done during the day and now our basement renters probably hate us, but we are ready to start laying down the floor.

It seems like the work should go really quickly now, but we happen to have a diagonal doorway going from our kitchen to the hallway to the bathroom, and that diagonal doorway is what Satan would look like if he was a doorway. Stephen spends a good five hours and goes through almost a whole box of wood planks trying to cut it exactly right.

Two days later.....

Stephen eventually cut the plank to fit in the left side of the Satan doorway. It is absolutely perfect, and now we have arrived at the right side of the doorway where there is another diagonal piece of death that we'll need to cut, and we haven't mustered up the courage to do it.

But I am tired of not having a kitchen, and I'm less of a perfectionist than Stephen. So on this day after school, I plop down in front of the evil doorway corner with a piece of paper, a pencil, and a screwdriver, and start trying to trace the corner on the paper. I cut out my outline and lay it on a plank, trace around it, tape it, re-measure, and decide that this is too scary. I find a plank that Stephen ruined, trace my outline on that, and take it outside to try and cut it.

I've watched Stephen do this a lot, but never actually tried it. So it is a miracle that just an hour later, I still have both hands, and I also have a plank that fits pretttty well around the doorway. I am as proud as I have ever been.

Two days after that.....

We have finished laying down the floor in our kitchen! We have nailed the backs on the cabinets. We are almost ready to move the oven and fridge back in the kitchen and put up the new cabinets. Stephen and I walk around on the floors in awe that we can step from one room to another without getting tetanus.

Tonight....

I sit here blogging, listening to the light hammering in the kitchen. Stephen and his dad have moved back the fridge and are putting in the first base cabinets. There were (about 96) times I thought (and said) that we should have just hired a contractor, and if I had known how much work it was going to be we would have just hired a contractor, and we are never doing this again, and blablabla.

But the truth is, part of me loves that we do these things on our own. It's very satisfying to remember what this house looked like at the beginning, and then to see it now. Up until a week ago, I had never used a jigsaw and I certainly hadn't taught myself how to use any power tools. But now I have! It is a very empowering feeling. (If you are in need of a jigsaw, we used the Dewalt one in that link and I love it. I mean it's kind of a scary looking blade, but I found it to be very user-friendly.)

I'll post before and after pictures of the kitchen when we are all done, fo real. Trust me, I am even more excited than you are for that :)

Friday, September 19, 2014

How to Survive without a Kitchen

I can think of a few scenarios that might land you in a kitchenless situation, such as:

- some sort of natural disaster destroyed your kitchen
- maybe that natural disaster was your own underestimation of how long the demolition and reinvention of your kitchen would take
- you are living in a hotel or traveling for an extended period of time (summer sales? roadtripping around doing a concert tour? since Selena Gomez definitely reads my blog....)
- your husband sees a documentary about this photographer nature lover rock climber guy who has been living in Yosemite for a few years, just camping there and occasionally going into town to shower and go to the bar and stuff, and he thinks that lifestyle sounds cool and has somehow convinced you that it would be fun to follow in that guy's footsteps. Don't worry, this one isn't about me. And never will be. 

Anyhoo, if you do find yourself without a kitchen for several weeks, you have a few options:

1. You can become one of the Six Sisters and prep 40 freezer crockpot meals in a few hours, and then while you don't have an oven, you can just pop open your freezer, choose one of the pre-prepped gourmet meal-in-a-bags, and throw it in the crockpot. 

{Or if you're me, you can optimistically say you'll do this, and wind up having just one freezer crockpot meal the entire time your kitchen is under construction.}


2. When the crockpot meals don't pan out exactly how you had hoped, it's time to start stocking your fridge with the necessities. 
- Milk goes with cereal
- English muffins can be toasted in any room of the house
- Deli meats and provolone cheese, because the husband could happily eat sandwiches err meal of err day
- Cheddar cheese goes with Ritz crackers
- Apples, so you can include some fruit in your well-balanced diet


3. The microwave is going to be your best friend. Do you know what you can make in the microwave?? EZ mac, Ramen, Pastaroni, and any number of steam-in-a-bag-in-the-microwave vegetables. 

4. Take-out and fast food are other options. 

But, if you're anything like me, they will leave you with a sense of annoyance and fat, and you'll have to get the most expensive thing on the menu just because it looks the freshest while your husband is happy with two 50-cent sandwiches that probably got sat on. 

But, people have to eat, and sometimes take out and fast food are the only options. 

So, sue (persize) me. 
5. Free food is better than no food, and no food is better than free food. This is my personal motto for life, actually. I like free food more than some people like their brand-new puppies. 

During my kitchen hiatus, I took advantage of every free food I heard of. I cashed in on the free meal on my Cafe Rio card, used up the rest of a Zupa's gift card, used up the rest of a Coldstone gift card, went to Tucano's for a free meal for Stephen's birthday, got a muffin and a banana from some retirement people who came to my school, got a granola bar from some JEA people who came to my school, and asked my students to bring in apples for Apple Week. We used some of them in cinnamon apples (it was supposed to be applesauce, but we didn't cook it for long enough, so we just ended up with some bomb-amazing cinnamon apples instead), and then tasted some of them fresh. If there is a meeting during this time where they will feed you, you should absolutely take advantage of it. If someone brings in a box of donuts and leaves it in the faculty room with a note that says "Eat me," you should definitely oblige. Farm to School is in full swing right now, and you better believe I have taken my share of the raspberries and yogurt / fresh peaches / watermelon they offer at my school.


6. Try to go over to your in-laws' house as often as possible. They will feed you! And they will even let you use their oven / stove / sink, and after spending a weekend over there, you will feel almost back to normal.

7. Really, you need to accept that you are not going to be eating the greatest during this time. And then lower your expectations, and try to still be happy. 

The struggle is so real. 
Happy remodeling!

Saturday, July 26, 2014

Step Right Up

When I first started teaching, I chose a fish / underwater theme.

It worked great for the first year, because

1. I hung up a fish net and had an inflatable shark sitting on the bookshelf.
2. My quiet signal was "If I had a fishy wish, I'd wish my class would squish their lips!" and then they all had to make a fishy face at me.
3. I had the most angelic class you could ever ask for and we earned a class betta named Brad Rudolph (named by the class) and that was fun.

It didn't work great for the second year, because

1. I had a CRAZY start to the year, so no fish net or blow-up shark made it to the party. (Then Julie came and visited and spent an hour blowing up the blow-up shark, and then the next morning when it was all deflated, we realized it had a hole in it. So all I had by way of decorations were some paper fish stapled to the walls.
2. My quiet signal still worked great.
3. I had a very.....different class. And we did not earn a class pet, partly because we didn't earn it and partly because I was worried that if we did earn it someone would swallow it and partly because I didn't really feel like bringing the fish back and forth between my house and the school every weekend like I did my first year.

So, last Sunday night, I decided to change my classroom theme.

I can't resist free stuff, and I especially can't resist cute, colorful free stuff on TeachersPayTeachers. So this year, I amassed a lot of cute, colorful free stuff that didn't really fit in with my fish theme, but I wanted to fit in with my next theme.

After a few hours of Pinteresting and googling and pondering, I decided on a circus theme.

{I'm sorry I didn't write that in all caps and with ten exclamation marks at the end, because that would have been more accurate for how I felt about it.}

I'm actually glad I made this decision on Sunday night, because I could barely sleep, I was so excited to go in and start decorating my classroom! I had so many ideas and I just couldn't wait to get to work. #teacherproblems

Here are some pictures of my cute new classroom:

Pull cards charts - one for each class. I got these adorable editable chevron labels from Common Core and So Much More. Click the link if you want to make your own - they're free!

My chair is under the Big Top :) where all the kids sit on the rug
These decoding strategies posters are perfect for my guided reading spot! I got them (also for free) from Andrea Knight and I LOVE them. 
I discovered this week that I can do anything with butcher paper! I'm going to hang up student work in this spot....work that they took "pride" in :) 
I'm trying something new this year: color coding tables! It's a slight variation on The Wise Owl Teacher's Pencil Wars, which is a brilliant idea that I kind of started doing at the end of last year and LOVED. I didn't do it quite as awesomely as she does it.....basically I just got 4 different colored cups for my 4 different colored tables and put 12 sharpened pencils in each cup to start the week. Each pencil had a colored star sticker on it that coordinated with that table. The problem for me was that I had 2 classes, so pencils got shuffled back and forth between two classes and it wasn't exactly fair and whatever.

So this year, I'm trying out these drawers. Each table has a set of 3 drawers. When they are with me and I ask them to get their drawers, they will bring it to their table. When they go to French, they put the drawers back on the cart so the other class doesn't use their supplies.

In the top drawer, I have whiteboard markers. In the middle drawer, there are correcting pens. In the bottom drawer, there are the pencils for the Pencil War, along with a bunch of little pencil sharpeners that I got on Amazon. These are the things that they don't need every day, but for whatever reason they seem to always get lost when I give one to each student to keep track of in their own toolbox. I'm hoping that by keeping all the correcting pens / markers / pencil sharpeners in one place, they won't get lost so quickly! 
Here's my whole class reward: circus peanuts! The class can earn peanuts for good behavior. When all the peanuts are colored in, we will have earned our reward. 
I got these amazing schedule cards from First Grade Parade. She has like a MILLION on that link, I'm not even kidding. I just picked and chose which ones I would need and sent them in for laminating and Velcro. 
I'm also changing up my Word Wall this year. I figured out how many weeks we would be in school in each of the months and put together a list of words I wanted on the Word Wall in that month. I typed them (color coding by month), printed, laminated, and velcroed them, and put them in baggies. Every week I'll pull out how many words from the correct bag, and at the end of the week, we'll move those words to the word wall.  
My calendar corner! I have the class rules, birthday calendar, and Class Pledge posted. We say that err morning. 
Here's a closeup of the rules.
The birthday chart! This year, for birthdays, I made up some crown headbands. When it's someone's birthday, they can spend their morning work time coloring and decorating their crown, and then they can wear it all day.  
I'm so excited about my new lunch choice center! As you can see I didn't bother measuring or anything to put down the highlighter tape in straight lines :) I think the reason I'm so excited about these guys is that when my teacher friend Jessica gave them to me, I discovered this magical thing called magnet tape. It looks like electrical tape but it's SO MUCH MORE! It's super thin and handy and it sticks wayyy better than the magnet roll I've always used. (When did I start getting so excited about office supplies.....) 
I know this is an octopus. I may replace it with something more circusy, but let's just focus on the positive for a second. The labels are new! I got them from somewhere....maybe the Digibutterfly? and just wrote my jobs on. I made this at the end of last year (3 weeks ago) and my kids were all getting jealous. "Mrs. Shimp, why didn't you make this job chart for us?" I have to agree that it's an improvement! 
New word wall! This also incited a lot of jealousy in last year's second graders. 
I can't wait to do this with my new kids! I tried it out to end the year and just slightly changed the poem to say "We must have had a great school year." It was a hit! It is so easy to make and pretty inexpensive. I got the idea, recipe, AND poem from A Day in First Grade. 
The view from my pink chair
The view from the door 
I found this cute poster and now I can't find it anymore?? If you made it, let me know so I can give you credit! 
What's a circus without horses? These are old plastic...food trays maybe? that another teacher was getting rid of. I cut out some construction paper tutus and voila!

Butcher paper elephant
The book boxes are all ready for kids to arrive! The flags were so easy and fun to make. I'll include a little mini tutorial at the bottom of this post. 
There's my messy desk area. I actually managed to get it all clean after taking that picture....I just don't have any evidence. I have my files behind me, folders to give out on the first day, and my colored drawers that I absolutely could not live without! I put all the handouts I need in those drawers. The clear drawers are for random crafty things, blue is Monday, orange is Tuesday, etc. I can plan out two weeks with these! It's wonderful!
My bulletin board in the hallway. It's not done yet - on Monday, it's going to say "Mrs. Shimp's Class is Coming!" And for their first homework assignment, my kids are going to decorate train cars to link up with mine. 
Okay, so here's how I did the big top. 

Start with 2 long sheets of butcher paper. I did red and white. They don't actually need to be this long; I ended up cutting mine in half.  
Cut it into strips. 
I tried a few different ways and this worked the best. Staple the strips one at a time around a piece of string / ribbon / twine / whatever. I used kite string and it worked great. Once you've stapled them on the string, either staple or tack up the string pretty high on your wall. 
I then stapled the other end of 4-5 "streamers" on a strip of black cardstock, and slipped the cardstock in the ceiling tiles. So, no one tell the fire marshall. I don't know what ceilings at other schools are like, but that's just what worked for me. It was kind of a pain in the butt, but I like the final result!
The flags were a lot easier and faster. All you have to do is cut a bunch of colorful triangles with construction paper or scrapbook paper. For the first one, fold it over the string, staple it down, and then tie a knot to keep that triangle in place. 

Continue to fold and staple until you feel like you have enough.


Hang it up on the wall and you are done!
PS - I also found a super-cute Power Point template for Back to School Night, here. Going along with my circus theme, I'm going to hand out little bags of popcorn with these notes.

Do you have any other great ideas for how I can spruce up my classroom?? I'd love to hear them!

Saturday, July 12, 2014

By My Own Self

Stephen is pretty much the handyman DIY-er around here. He has handymanned the bathroom, the air conditioning, the living room floors, the bedroom floors, and done a whole lot of painting, besides. And I haven't even mentioned the ladder that he built in like 8 minutes yesterday out of some 2x4's.

I am also a little bit of a DIY-er. I have made a garden, a skirt, a love story sign....uh, one time I made this needlepoint thing in Young Women's....I went through a big latch-hook phase in middle school....plus I also make dinner almost e'er night.

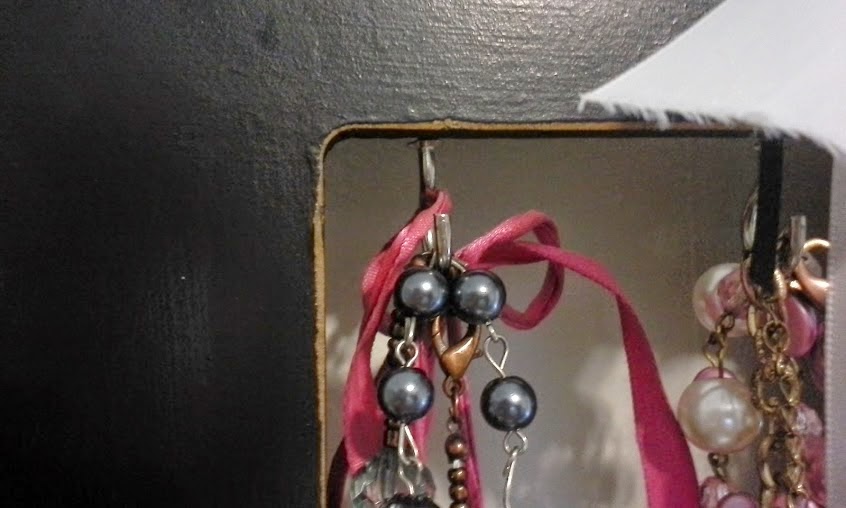
And last week, I DIYed a jewelry hanger! Here's the final product:

Just hanging on the mirror for now...
I don't usually blog about my DIY adventures, but Daily Tay blogged about her's, and she said that if I blog about mine, I will be entered to win a $100 Visa gift card! So, motivated.

Here's how I DImyself:

Step 1. Find a cute picture frame. I got mine at a fundraiser carnival for Alex Homer, this absolutely adorable little boy who is going to be in my class next year. They had a boutique set up at the carnival and I felt like I was walking through a real live Etsy. I bought my picture frame already painted black, already distressed on the edges, and already hanging on the ribbon. But you could really get any thick picture frame that you like, and then you're of course welcome to paint it and distress the edges and whatever else you want to do.

Step 2. Get cup hooks. I got mine from Home Depot, here. I got the nickel-plated ones, but they also have them in white and gold. These are super-easy to work with on one condition: your picture frame has to be pretty thick. Otherwise, when you screw in the cup hooks, the wood will bump up and pucker and bulge and splinter.

Step 3. Screw in the cup hooks. I've seen a bunch of these on Pinterest where people put their's on the bottom of the frame, too. I chose to put mine on the inside of the top.

As you can see, I didn't quite screw my hooks in all the way. 
Step 4. Hang up all your jewelry and rejoice because it doesn't need to sit in a clump in the spare bedroom anymore!

I put like 3-4 necklaces on each hook, and so far, I have not had any problems. They've held up great! 
By the way, does anyone have a great idea for what I can use an old window for? It has 3 rectangular sections and I just know I could make it into something awesome!